Overview
- Hardware
- Windows PC
- BASYS3 FPGA board
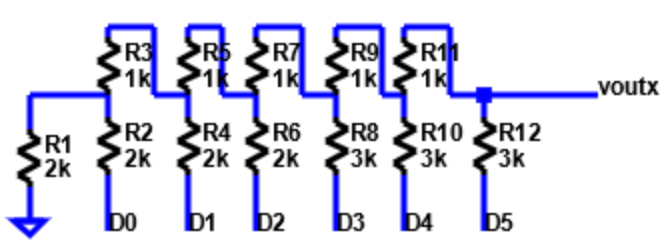
- Breadboard with 16 Bit R2R DAC
16 resistors 100k, 17 resistors 200k - Software
- NodeJS (18.12.1, npm 8.19.2)
- FPGA Programming files (Vivado 2019.1)
- NodeJS server and client files (V06)
Software installation time: 1.5 hours
Hardware installation time: 1.5 hours
Test usage: 1 hour
Node Install
- Get zip file from: https://nodejs.org/download/release/v20.9.0/
node-v20.9.0-win-x64.zip
Inside should be a directory node_modules/npm and node_modules/corepack - Unzip all files to C:\temp\NodeEEBench\node
- Get a command prompt: cmd.exe
Change to the node directory C:\temp\NodeEEBench\node or make a new text file cmd.bat with a line: start cmd.exe
start this batch file by double clicking on it - Set the path variable at the command line:
set PATH=%PATH%;C:\temp\NodeEEBench\node - Look for node.js version at the command prompt
node --version - Look for npm version at the command prompt
npm --version
Everything will be installed (copied) to C:\temp\NodeEEBench without administrator rights.
Some node zip files contain npm otherwise npm has to be installed separately.
Get node binary (node.exe) from http://nodejs.org/download/
Download the last zip version of npm from http://nodejs.org/dist/npm
Unpack the zip inside the node folder.
FPGA programming environment
- Install Vivado 2019.1 or higher version
- Download Xilinx BASYS3 VHDL files: EEBench_V06.zip
- Unzip the file to a subdirectory Xilinx
- Open Vivado and create a new project: EEBench
- Add Sources .vhd
- Add constraints
- Default Part: xc7a35tcpg236-1
- Make EEBench to top: Sources, EEBench, right click set as top
- XADC IP should be present
- Generate bitstream
- Connect BASYS3 board via USB
- Program and Debug, Open Hardware Manager, Open Target
- Program and Debug, Open Hardware Manager, Program Devices
If the XADC is not present the project can not be compiled and
only the bit file can be transfered to the BASYS3 board
The BASYS3 can also be permanently programmed by transfering the
bitfile to the Flash memory.
Nodejs Webserver
- Download Node js command files: NodeEEBench_V06.zip
- Extract NodeEEBench_V06 to a subdirectory NodeEEBench
- Open a cmd line window and check for COM ports:
Command line instruction: Mode
Lists all COM ports and gives COM4 for BASYS3 - Check the COM port settings with a text editor in ServerEEBench.js
var serialPort({ path: "COM22", ..}) and modify accordingly. - Set the path variable in the file NodeEEBench.bat:
set PATH=%PATH%;C:\temp\NodeEEBench\node - Go to the subdirectory and double click on NodeEEBench.bat
A command line window should open and the webserver should be started. - Open a browser window and connect to the server:
http://localhost:3000/
Issues
- Missing nodejs modules
Cannot find module 'express'
Open command line window. Change to node directory. Install missing modules with npm.
npm install express
npm install serialport
npm install socket.io
- Check the COM port settings with a text editor in ServerEEBench.js
var serialPort = new SerialPort({ //"\\.\COM22" path: "COM22", baudRate: 230400 // Baud rate befor 19200, 52 us per bit }); - Go to the subdirectory and double click on NodeEEBench.bat
A command line window should open and the webserver should be started.
If there are problems open a command line window, set the path and start node ServerEEBench.js and examine the error message
Hardware assembly and test
|
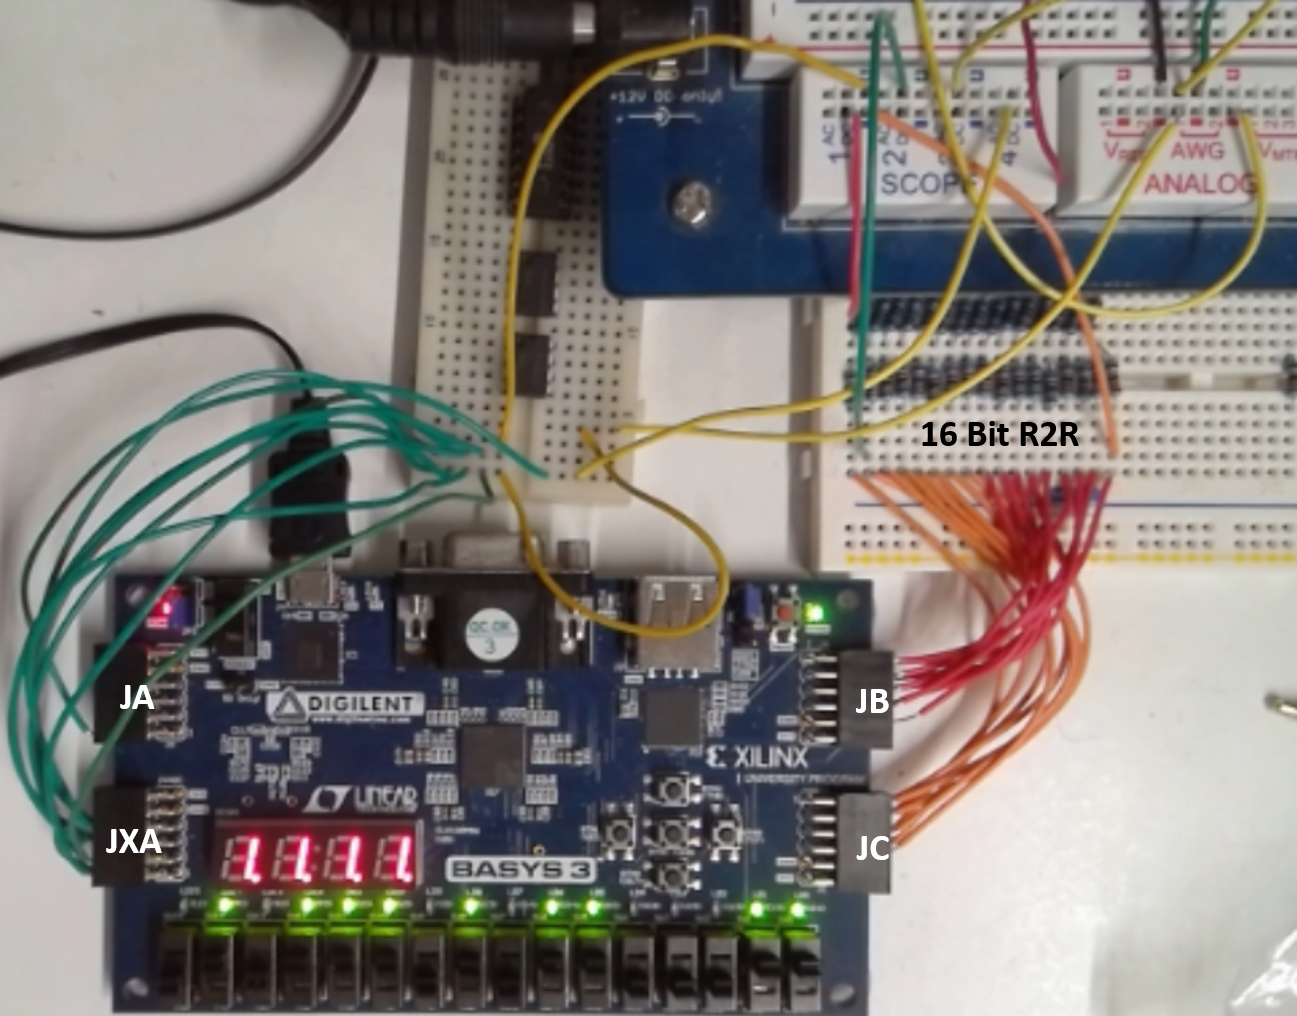  |
For debugging an external wave generator and oscilloscope should be used.
Summary
- Detailed instructions for installation
- Further information
EE Bench Research Summary - Questions: Email
joerg.vollrath(a)hs-kempten.de
joerg.vollrath(a)ieee.org
Platform Software and Hardware
- Easy to understand, use, modify and expand
- Hardware: FPGA, Arduino, RaspberryPi
- Hardware: DAC and ADC
- Software: Modules, Versions, Configuration, Interfaces
- Documentation on the Internet
Tasks EEBench Software
- FPGA and software control of 8 digital PMOD pins
Clock, counter, serial interface protocol, SERDES - Make a digital signal processing interface
One OSC input is processed via a user defined software dsp algorithm (PID, filter, amplifier) implemented in FPGA hardware and the output given to AWG. - Implement Ramp INL and DNL measurement
- Make EEBench available for more platforms and hardware configurations
- Implement second/third signal generator
- Make EEbench more user friendly for hardware and software development
Tasks Hardware
- Support Arduino Maker Wifi1010 with ADC, DAC PMOD
- Activate Arduino Maker Wifi1010 WiFi interface
- Support RaspberryPi with webserver on the raspberryPi and ADC, DAC PMOD
- Support more ADC and DAC circuits and PMODs